Difference between revisions of "Multi-story housing"
Jump to navigation
Jump to search
 To meet Wurmpedia's quality standards, this article or section requires a cleanup by the Wurmpedia Team.
Xsamuraizx (talk | contribs) m (→Skill needed: tested it's 50 for 7) |
MamaDarkness (talk | contribs) (update of skill requirements.) |
||
| Line 20: | Line 20: | ||
!Floors !! [[Carpentry]] | !Floors !! [[Carpentry]] | ||
|- | |- | ||
| − | || 2 || | + | || 2 || 19 |
|- | |- | ||
| − | || 3 || | + | || 3 || 30 |
|- | |- | ||
| − | || 4 || | + | || 4 || 39 |
|- | |- | ||
| − | || 5 || | + | || 5 || 47 |
|- | |- | ||
| − | || 6 || | + | || 6 || 55 |
|- | |- | ||
|} | |} | ||
| Line 37: | Line 37: | ||
!Floors !! [[Carpentry]] | !Floors !! [[Carpentry]] | ||
|- | |- | ||
| − | || 7 || | + | || 7 || 63 |
|- | |- | ||
| − | || 8 || | + | || 8 || 70 |
|- | |- | ||
| − | || 9 || | + | || 9 || 77 |
|- | |- | ||
| − | || 10 || | + | || 10 || 83 |
|- | |- | ||
| − | || 11 || | + | || 11 || 88 |
|- | |- | ||
|} | |} | ||
| Line 54: | Line 54: | ||
!Floors !! [[Carpentry]] | !Floors !! [[Carpentry]] | ||
|- | |- | ||
| − | || 12 || | + | || 12 || 92 |
|- | |- | ||
| − | || 13 || | + | || 13 || 95 |
|- | |- | ||
| − | || 14 || | + | || 14 || 97 |
|- | |- | ||
| − | || 15 || 99 | + | || 15 || 98 (can add 16th story roof at 99 carp) |
|- | |- | ||
|} | |} | ||
Revision as of 18:37, 13 February 2014
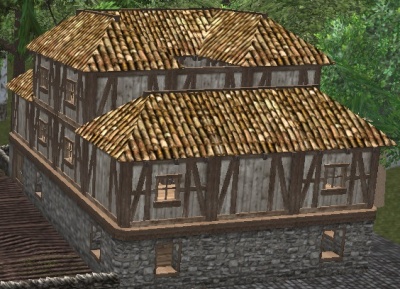
Multi-story structures can only be built on flat tiles.
Contents
Skill needed
The more floors your house has, the more skill is needed; see the table below for the required skill levels. Only the first (ground) floor planning needs 1 carpentry skill per wall and 1 skill per tile. With 20 skill a roof may be placed over the first floor, but not an opening or floor above. For upper floors, the roof counts as a floor (although it may have less of a skill requirement than an opening or floor above - unconfirmed).
- update stone wall require masonry to make upper floor.
|
|
|
Adding a roof
- Plan and completely build the walls.
- Use a mallet to plan the ground floor.
- Use mallet on tile below and plan floor below.
- Then plan roof above.
- Use mallet on tile below and plan roof above.
- Build them.
How to make another floor
- Plan and completely build the ground floor walls.
- Then use a mallet to plan the ground floor.
- Use mallet on tile below and plan floor below
- Then plan floor/roof above.
- Use mallet on tile below and plan floor above
- Plan a tile with an opening above to make a ladder climbing spot to climb up to upper floors.
- Build them.
- Use ladder to get up to upper floor.
- For next floors build walls where needed and then plan roof/floor above.
Notes
- In-game descriptions describe the bottom floor as being the 1st, which is a US standard. Therefore the Wurmpedia will describe this as such. The use of the term ground floor or ground will be kept to a minimum.
- There must be at least one planned wall below a tile to plan an floor above.
- You can not build floors above fences, walls or parapets.
- You can drag carts up ladders to get them to an upper floor.
- You can fall and take damage from upper floors if there is no wall/fence of roof to stop you. (Please be careful as people have died in 1 fall from 4th floor drops)
- Ladders will always be on the south side of the opening.
- The 1st floor must be complete before walls on the 2nd can be planned. This is not true, however, of any additional floors.
- Where a mallet is mentioned a hammer can be used in its place.
- When you destroy a structure all items on upper levels will fall to the ground.
Floor and Opening types
Roof types
Fence types
Wooden parapet -- More info needed
Stone parapet -- More info needed
Stone and iron parapet -- More info needed
More Info
For More Images and Info please check:
and

