Difference between revisions of "Interface and controls"
m (→Statusbar: inventory status bar) |
m (Added new pic, goals tab info) |
||
| (81 intermediate revisions by 19 users not shown) | |||
| Line 1: | Line 1: | ||
[[CDB|Main]] / [[Tutorials]] / '''{{PAGENAME}}''' | [[CDB|Main]] / [[Tutorials]] / '''{{PAGENAME}}''' | ||
| − | == Movement | + | == Game controls == |
| − | <p>To move in the world of Wurm, simply use the {{key|W}} {{key|A}} {{key|S}} {{key|D}} keys, or the arrow keys, on your keyboard.</p>To look around, left-click and hold in the 3D-view, and move your mouse. Alternatively you can press the right or left arrow keys. <p>To | + | ===Movement === |
| − | <p>To Auto-run press the {{key|X}} key | + | <p>To move in the world of Wurm, simply use the {{key|W}} {{key|A}} {{key|S}} {{key|D}} keys, or the arrow keys, on your keyboard.</p>To look around, left-click and hold in the 3D-view, and move your mouse. Alternatively you can press the right or left arrow keys. <p>To toggle between 1st and 3rd person, press {{key|V}} on your keyboard.</p> |
| − | + | <p>To Auto-run press the {{key|X}} key. Press it again to stop.</p> | |
| − | There is no jump | + | <p>See [[Client Key Bindings]] for a full list of default keybinds. </p> |
| + | '''There is no jump action.''' | ||
===Other keys=== | ===Other keys=== | ||
| − | <p> | + | <p>{{key|I}} : Inventory window </p> |
| + | <p>{{key|C}} : Character window</p> | ||
| + | <p>{{key|B}} : Crafting window</p> | ||
| + | <p>{{key|N}} : Crafting recipes</p> | ||
| + | <p>{{key|M}} : Map</p> | ||
| + | <p>{{key|O}} : Options</p> | ||
| + | <p>{{key|T}} : Chat focus</p> | ||
| + | <p>{{key|H}} : Brings up a dialog that allows you to search the wiki from in game.</p> | ||
| + | <p>{{key|Esc}} : Brings up the menu or, if you're currently busy, cancels the action.</p> | ||
| + | <br> | ||
| + | <p>{{key|F-keys}} on your keyboard hold important access to things in Wurm.</p> | ||
<p>{{key|F1}} : Brings up the console, for debugging and generic information.</p> | <p>{{key|F1}} : Brings up the console, for debugging and generic information.</p> | ||
<p>{{key|F2}} : Skill window </p> | <p>{{key|F2}} : Skill window </p> | ||
<p>{{key|F3}} : Inventory window </p> | <p>{{key|F3}} : Inventory window </p> | ||
| − | <p>{{key|F10}} : Hides the interface so you can take clean screenshots of any view.</p> | + | <p>{{key|F4}} : Client stats window </p> |
| − | <p>{{key|F11}} : Take a screenshot. It is saved in your wurm directory/screenshots as a png file.</p> | + | <p>{{key|F5}} : Check sleep bonus </p> |
| + | <p>{{key|F6}} : Time and date in Wurm </p> | ||
| + | <p>{{key|F7}} : Missions status </p> | ||
| + | <p>{{key|F8}} : Combat focus level </p> | ||
| + | <p>{{key|F9}} : Character window </p> | ||
| + | <p>{{key|F10}} : Hides the interface so you can take clean screenshots of any view. Press again to display the UI</p> | ||
| + | <p>{{key|F11}} : Take a screenshot. It is saved in your wurm directory/screenshots as a png or jpg file. (change in options before starting Wurm)</p> | ||
<p>{{key|F12}} : Quit the game. You are presented to a Yes/No-dialog before you can quit the game.</p> | <p>{{key|F12}} : Quit the game. You are presented to a Yes/No-dialog before you can quit the game.</p> | ||
| − | + | ||
== The Interface == | == The Interface == | ||
| − | |||
| − | |||
| − | |||
| − | |||
| − | |||
| − | |||
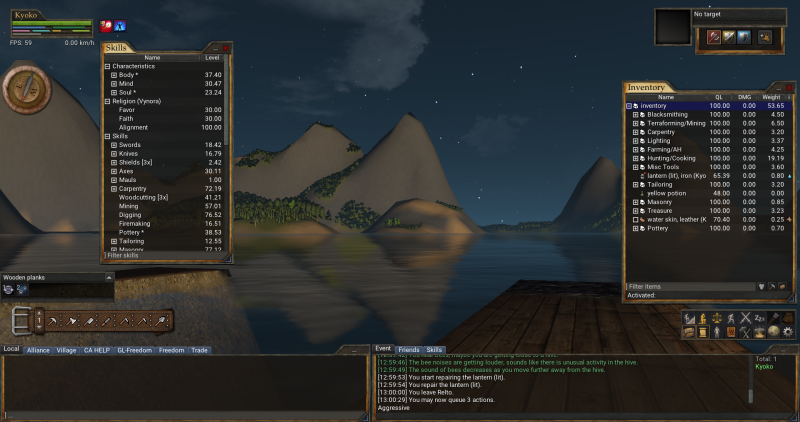
| − | + | [[File:ui1.png|800px|The user interface]] | |
| + | ===Main Menu=== | ||
| + | The various boxes of the user interface can be accessed by pressing {{key|Escape}}. | ||
| − | + | [[File:UIbar.JPG|800px|Main menu]] | |
| − | + | The menu looks slightly different through the Steam client, as it contains a button for the Steam shop, where players can buy silver and premium time. | |
| − | The | ||
| − | + | [[File:mainmenusteam.png|Main menu on on the Steam client]] | |
| − | |||
| − | + | '''Interface button''' | |
| − | + | *Inventory - The contents of your personal inventory, also accessed by pressing {{key|I}} or {{key|F3}}. | |
| − | + | *Skills - The list of all your character's skills, also accessed by pressing {{key|F2}}. | |
| + | *Character - A view of your character and its equipped items, also accessed by pressing {{key|C}} or {{key|F9}}. | ||
| + | *Select bar - A window that show what tile or item you have selected, and your options on that item. | ||
| + | *Journal - A journal of achievements that give special bonuses when completed. | ||
| + | *Crafting - The crafting window, also accessed by pressing {{key|B}}. | ||
| + | '''Tools''' | ||
| + | *Cooking recipes - a list of your known cooking recipes. | ||
| + | *Timers - Custom timers | ||
| + | *Achievements - A list of achivements. These are different from the journal. | ||
| + | *World map- The various maps of the islands on Wurm. | ||
| + | *Valrei map - The map of Valrei, where the gods do battle. | ||
| + | *Wurmpedia - Opens a search box for the Wurmpedia. | ||
| + | *Console - Opens your console window. | ||
| + | *More - The HUD settings menu. | ||
| + | '''Hotkeys''' | ||
| + | *Brings up the settings menu, keybinds tab | ||
| + | '''Settings''' | ||
| + | *Also brings up the settings menu | ||
| + | '''Goals''' | ||
| + | *Brings up the list of Steam achievements. | ||
| − | + | === Inventory === | |
| + | [[Image:Inventory.png|right|thumb|Inventory Menu]] | ||
| + | {{main|Inventory}} | ||
| + | Your inventory is where you carry the items you start with, create and pick up. To activate an item, double left-click on it. | ||
| + | To equip an item, Right click the item and click equip. You can also equip by opening your character sheet (C) and drag the items into the appropriate slot. | ||
| − | + | ''Note'': If you carry too much in your inventory, your walking speed is reduced. You can also become encumbered, and walk extremely slowly, by carrying very heavy items such as felled trees. Improve your strength skill to carry more. | |
| − | + | Remember you can also use your body parts for certain things, like molding clay, by activating one of your hands by opening your character sheet and clicking on the hand icon in the bottom right corner, and then right-clicking the clay in your inventory, to work with it. You can also drag the hand icon to your [[tool belt]] and save, for convenience. | |
| − | + | Your body will only show up on the inventory window if the "Display 'body' in inventory" option is checked on the "Game" tab in the game settings. | |
| − | === | + | === Skills === |
| − | [[Image: | + | [[Image:Skillsbox.png|right|thumb|Skill List]] |
| − | + | {{main|Skills}} | |
| + | Hit {{key|F2}} on your keyboard to show a list of your skills. There are 3 main categories in this window, [[characteristics]], [[religion]], and [[:Category:Skills|skills category]]. The characteristic sub-skills are values representing the current state of your body, mind and soul. For instance, to be able to attack anything, your body characteristic must be at least 1.5, or you will be too weak. Each sub-characteristic is again divided into several sub-characteristics, which have their own functions. For instance, the maximum amount of weight you can carry is determined by your body strength. | ||
| − | + | Religion skills consist of [[faith]], [[favor]] and [[alignment]]. Alignment is an indication whether your character is good or evil. Alignment is determined by the actions you perform. Some [[gods]] won’t accept your [[Praying|prayers]] if you are evil. Faith is a measure of how much your chosen god likes you, and how much power they bestow on you. Faith is increased by praying at an altar dedicated to your chosen god. Faith is capped at 30 for players who do not wish to become [[priest|priests]]. Priests are dedicated to following the will of their god, and a priest has the ability to cast his or her gods [[:Category:Spells|spell]]s at the cost of favor. Favor is the equivalent of mana in many other role playing games. [[Favor]] is regained over time, or a priest may sacrifice items to their god to regain favor. | |
| − | |||
| − | + | The [[:Category:Skills|skills category]] is by far the most interesting as it lists all the skills available, as well as a number representing your expertise within that skill. As your skills increase you will find that the various tasks in the game become easier, and you will be able to make higher quality items. If your character dies, you can lose 0.25 points from 5 random skills, along with 0.25 fighting skill and 0.01 body strength. You will then see a 3x next to the skill, indicating that you will gain points at 3 times the normal rate in that skill until you reach your previous level (except for the fighting skill). | |
| − | |||
| − | === | + | === Healthbar === |
| − | + | Hovering the mouse over any of these bars will provide more information on the overall player status. Use the right mouse button on the bar to select which information to display. Descriptions are top to bottom, reading left to right. | |
| − | |||
| − | ==== | + | [[Image:healthbarnofavor.png|right|thumb|Health bar]] |
| − | + | [[File:healthbar.jpg|right|thumb|Health bar with priest favor]] | |
| + | ; '''<font color="green">Green</font>''' : Remaining [[stamina]]: this will decrease while performing actions and walking. Remaining still (while not climbing) and not performing any actions will replenish stamina. | ||
| + | ; '''<font color="red">Red</font>''' : [[Healing|Damage]] taken; this indicates how much damage the player has taken and directly impacts how much stamina can be stored. Once this reaches 100% (red) the player dies. | ||
| + | ; '''<font color="blue">Blue</font>''' : Remaining retained [[water]]: directly proportional to stamina regeneration. The higher the thirst of a player the slower their stamina replenishes. A player cannot die from thirst. | ||
| + | ; '''<font color="orange">Orange</font>/<font color="green">Green</font>''' : Hunger level and [[nutrition]]al status; directly proportional to stamina regeneration. The higher the hunger of a player the slower their stamina replenishes. A player cannot die from hunger. Colour changes to green at higher nutritional level and orange at lower. Low food level can prevent a player from completing strenuous tasks such as digging and felling trees. | ||
| + | ; '''<font color="pink">Pink</font>''' : Calories: A higher calories bar reduces stamina drain. | ||
| + | ; '''<font color="turquoise">Turquoise</font>''' : Carbohydrates: A higher carbohydrates bar bar reduces water usage. | ||
| + | ; '''<font color="yellow">Yellow</font>''' : Fats: A higher fats bar increases favour regeneration and reduces sleep bonus drain. | ||
| + | ; '''<font color="lime">Lime</font>''' : Proteins: A higher proteins bar reduces food usage. | ||
| + | ; '''<font color="grey">Grey</font>''' : Sleep bonus: Remaining [[sleep bonus]]. | ||
| + | ; '''<font color="purple">Purple</font>''' : Favor: Remaining [[favor]] ([[priest]]s only). For new priests: This bar will become visible once faith is increased above 30.00 | ||
| − | The | + | === Target Window === |
| + | {{main|Target}} | ||
| + | The target window shows the current combat [[target]]. | ||
| − | + | === Select Bar === | |
| + | {{main|Select bar}} | ||
| − | + | The [[select bar]] shows what is currently selected as well as quick keys for common actions. | |
| − | + | === Chat === | |
| + | {{main|Chat}} | ||
| + | [[Image:Chatbox.png|right|300px|Chat box]] | ||
| + | [[Image:Eventstab.png|right|300px|Event window]] | ||
| − | + | The chat interface is where you can talk to other players and see ongoing conversations between others who are talking publicly. There are many tabs in this window, including local (80 tiles around you), village (the village you belong to), and the various servers. This is also where you find the trade window, to buy and sell goods and services. See [[Chat]] for more details. | |
| − | + | ''' Death tab''' | |
| − | + | Shows players on the same server who have died, [[death]]. Can be turned on and off through in-game profile | |
| − | + | === Statusbar === | |
| + | The statusbar (or "status bar") is a part of the [[#Event window|event window]]. There is also a status bar at the bottom of the [[#Inventory|inventory window]]. | ||
| − | + | '''Current status''' | |
| − | + | ''Hurting:'' | |
| − | '' | ||
| − | This | + | This shows up after you have been injured, and is related to your red Injuries bar. While this status is active, you will walk slower. |
| − | '' | + | ''Climbing:'' |
| + | This shows up when you press the climb button. See [[climbing]] for more detail. | ||
| − | + | ''Fighting:'' | |
| − | + | This shows up when you are in combat. See [[fighting]] for more detail. | |
| − | + | ''Defensive, Aggressive:'' | |
| − | '' | + | This shows up when you select one of these modes on the 'right click menu'. See [[fighting]] for more detail. |
| − | + | ''Tired, Exhausted:'' | |
| − | + | These are states relating to your green Stamina bar. When you are Exhausted, you will walk slower. You will also be far more vulnerable to attacks. | |
| − | + | === Event window === | |
| + | '''Event''' | ||
| − | + | This text box shows your actions, and their results. It also gives other information like actions performed by people near you, and important messages from GMs. | |
| − | |||
| − | |||
| − | '' | + | '''Friends''' |
| + | {{main|Friend}} | ||
| − | + | Used to quickly see which of your friends are online or offline, and for removing them. | |
| − | '' | + | '''Skills''' |
| − | + | Shows a player's skill gain. The frequency of updates can be adjusting in the Settings menu, UI tab. | |
| − | '' | + | ''' Combat ''' |
| − | + | Shows action while a player (or a nearby player) is [[fighting]]. Any attacks, failed or successful, as well as spells cast will be shown here. | |
| − | + | === Quickbar === | |
| − | + | {{main|Quickbar}} | |
| − | + | The quickbar contains buttons to toggle statuses and actions. | |
| − | + | === Custom timers === | |
| + | {{main|Custom timer}} | ||
| + | Player made timers which can be useful for [[priest]]s. | ||
| − | + | == Interacting with the world == | |
| + | To interact with objects, tiles, players, creatures, etc, right-click on them. A list of available [[action]]s will pop up. Note that some actions are only visible and available with a particular tool active. For example, the "Cut down" action will appear if the [[hatchet]] or similar tool is active and a [[tree]] tile is right-clicked. | ||
| − | + | ===Moving objects=== | |
| + | Most objects can be: | ||
| + | * Pushed / pulled | ||
| + | * Pushed / pulled gently | ||
| + | * Rotated (clockwise or counterclockwise) | ||
| + | * Moved to center of tile | ||
| + | * Placed | ||
| − | + | There are some exceptions, as some items are not able to be moved (eg. [[guard tower]], [[market stall]]). | |
| − | + | You can also move objects into a container by dragging and dropping the object over the container image: | |
| − | + | [[File:Dragtocontainer.gif]] | |
| − | + | ====Place==== | |
| + | Placing an item allows you to precisely pick where on a tile to place an item, as well as in what direction. | ||
| − | + | * To place an item, right click on it and select '''Drop > Place'''. To place the item, left-click (or a double click sometimes may be necessary) where you wish it to be placed | |
| − | + | * Use the mouse wheel to rotate the object. | |
| + | * The item will appear where your cursor is as a green silhouette. If the silhouette is red, this means the object may not be placed in that spot. You can place the item within 1 tile of where you stand. (Note: You may move while placing - it will not cancel the action). | ||
| + | **You must have GLSL enabled to place or the green/red silhouette will not show. | ||
| + | * A timer will show in your Event tab, showing 2 minutes remaining. This timer is how long you have until the Place action will time out. | ||
| + | * You may need to pick up or push an item to place it very far away. {{event|inline|You cannot place the item that far away.}} | ||
| + | * If you place an item right under you, the action timer for moving it, is always 5 seconds. | ||
| − | |||
[[Category:Guides]] | [[Category:Guides]] | ||
| + | [[Category:Interface]] | ||
[[Category:Babel/I]] | [[Category:Babel/I]] | ||
Latest revision as of 21:53, 7 May 2023
Main / Tutorials / Interface and controls
Contents
Game controls
Movement
To move in the world of Wurm, simply use the W A S D keys, or the arrow keys, on your keyboard.
To look around, left-click and hold in the 3D-view, and move your mouse. Alternatively you can press the right or left arrow keys.
To toggle between 1st and 3rd person, press V on your keyboard.
To Auto-run press the X key. Press it again to stop.
See Client Key Bindings for a full list of default keybinds.
There is no jump action.
Other keys
I : Inventory window
C : Character window
B : Crafting window
N : Crafting recipes
M : Map
O : Options
T : Chat focus
H : Brings up a dialog that allows you to search the wiki from in game.
Esc : Brings up the menu or, if you're currently busy, cancels the action.
F-keys on your keyboard hold important access to things in Wurm.
F1 : Brings up the console, for debugging and generic information.
F2 : Skill window
F3 : Inventory window
F4 : Client stats window
F5 : Check sleep bonus
F6 : Time and date in Wurm
F7 : Missions status
F8 : Combat focus level
F9 : Character window
F10 : Hides the interface so you can take clean screenshots of any view. Press again to display the UI
F11 : Take a screenshot. It is saved in your wurm directory/screenshots as a png or jpg file. (change in options before starting Wurm)
F12 : Quit the game. You are presented to a Yes/No-dialog before you can quit the game.
The Interface
Main Menu
The various boxes of the user interface can be accessed by pressing Escape.
The menu looks slightly different through the Steam client, as it contains a button for the Steam shop, where players can buy silver and premium time.
Interface button
- Inventory - The contents of your personal inventory, also accessed by pressing
I or F3.
- Skills - The list of all your character's skills, also accessed by pressing
F2.
- Character - A view of your character and its equipped items, also accessed by pressing
C or F9.
- Select bar - A window that show what tile or item you have selected, and your options on that item.
- Journal - A journal of achievements that give special bonuses when completed.
- Crafting - The crafting window, also accessed by pressing
B. Tools
- Cooking recipes - a list of your known cooking recipes.
- Timers - Custom timers
- Achievements - A list of achivements. These are different from the journal.
- World map- The various maps of the islands on Wurm.
- Valrei map - The map of Valrei, where the gods do battle.
- Wurmpedia - Opens a search box for the Wurmpedia.
- Console - Opens your console window.
- More - The HUD settings menu.
Hotkeys
- Brings up the settings menu, keybinds tab
Settings
- Also brings up the settings menu
Goals
- Brings up the list of Steam achievements.
Inventory
- Main article: Inventory
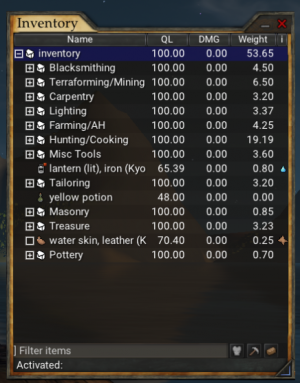
Your inventory is where you carry the items you start with, create and pick up. To activate an item, double left-click on it. To equip an item, Right click the item and click equip. You can also equip by opening your character sheet (C) and drag the items into the appropriate slot.
Note: If you carry too much in your inventory, your walking speed is reduced. You can also become encumbered, and walk extremely slowly, by carrying very heavy items such as felled trees. Improve your strength skill to carry more.
Remember you can also use your body parts for certain things, like molding clay, by activating one of your hands by opening your character sheet and clicking on the hand icon in the bottom right corner, and then right-clicking the clay in your inventory, to work with it. You can also drag the hand icon to your tool belt and save, for convenience.
Your body will only show up on the inventory window if the "Display 'body' in inventory" option is checked on the "Game" tab in the game settings.
Skills
- Main article: Skills
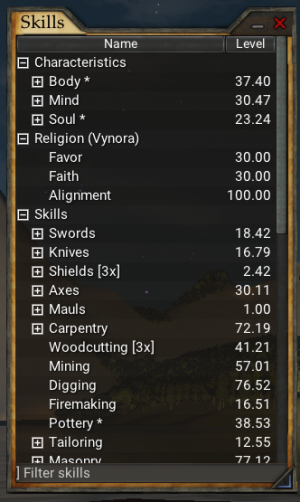
Hit F2 on your keyboard to show a list of your skills. There are 3 main categories in this window, characteristics, religion, and skills category. The characteristic sub-skills are values representing the current state of your body, mind and soul. For instance, to be able to attack anything, your body characteristic must be at least 1.5, or you will be too weak. Each sub-characteristic is again divided into several sub-characteristics, which have their own functions. For instance, the maximum amount of weight you can carry is determined by your body strength.
Religion skills consist of faith, favor and alignment. Alignment is an indication whether your character is good or evil. Alignment is determined by the actions you perform. Some gods won’t accept your prayers if you are evil. Faith is a measure of how much your chosen god likes you, and how much power they bestow on you. Faith is increased by praying at an altar dedicated to your chosen god. Faith is capped at 30 for players who do not wish to become priests. Priests are dedicated to following the will of their god, and a priest has the ability to cast his or her gods spells at the cost of favor. Favor is the equivalent of mana in many other role playing games. Favor is regained over time, or a priest may sacrifice items to their god to regain favor.
The skills category is by far the most interesting as it lists all the skills available, as well as a number representing your expertise within that skill. As your skills increase you will find that the various tasks in the game become easier, and you will be able to make higher quality items. If your character dies, you can lose 0.25 points from 5 random skills, along with 0.25 fighting skill and 0.01 body strength. You will then see a 3x next to the skill, indicating that you will gain points at 3 times the normal rate in that skill until you reach your previous level (except for the fighting skill).
Healthbar
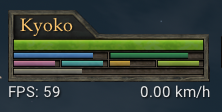
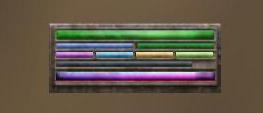
Hovering the mouse over any of these bars will provide more information on the overall player status. Use the right mouse button on the bar to select which information to display. Descriptions are top to bottom, reading left to right.
- Green
- Remaining stamina: this will decrease while performing actions and walking. Remaining still (while not climbing) and not performing any actions will replenish stamina.
- Red
- Damage taken; this indicates how much damage the player has taken and directly impacts how much stamina can be stored. Once this reaches 100% (red) the player dies.
- Blue
- Remaining retained water: directly proportional to stamina regeneration. The higher the thirst of a player the slower their stamina replenishes. A player cannot die from thirst.
- Orange/Green
- Hunger level and nutritional status; directly proportional to stamina regeneration. The higher the hunger of a player the slower their stamina replenishes. A player cannot die from hunger. Colour changes to green at higher nutritional level and orange at lower. Low food level can prevent a player from completing strenuous tasks such as digging and felling trees.
- Pink
- Calories: A higher calories bar reduces stamina drain.
- Turquoise
- Carbohydrates: A higher carbohydrates bar bar reduces water usage.
- Yellow
- Fats: A higher fats bar increases favour regeneration and reduces sleep bonus drain.
- Lime
- Proteins: A higher proteins bar reduces food usage.
- Grey
- Sleep bonus: Remaining sleep bonus.
- Purple
- Favor: Remaining favor (priests only). For new priests: This bar will become visible once faith is increased above 30.00
Target Window
- Main article: Target
The target window shows the current combat target.
Select Bar
- Main article: Select bar
The select bar shows what is currently selected as well as quick keys for common actions.
Chat
- Main article: Chat
The chat interface is where you can talk to other players and see ongoing conversations between others who are talking publicly. There are many tabs in this window, including local (80 tiles around you), village (the village you belong to), and the various servers. This is also where you find the trade window, to buy and sell goods and services. See Chat for more details.
Death tab
Shows players on the same server who have died, death. Can be turned on and off through in-game profile
Statusbar
The statusbar (or "status bar") is a part of the event window. There is also a status bar at the bottom of the inventory window.
Current status
Hurting:
This shows up after you have been injured, and is related to your red Injuries bar. While this status is active, you will walk slower.
Climbing: This shows up when you press the climb button. See climbing for more detail.
Fighting:
This shows up when you are in combat. See fighting for more detail.
Defensive, Aggressive:
This shows up when you select one of these modes on the 'right click menu'. See fighting for more detail.
Tired, Exhausted:
These are states relating to your green Stamina bar. When you are Exhausted, you will walk slower. You will also be far more vulnerable to attacks.
Event window
Event
This text box shows your actions, and their results. It also gives other information like actions performed by people near you, and important messages from GMs.
Friends
- Main article: Friend
Used to quickly see which of your friends are online or offline, and for removing them.
Skills
Shows a player's skill gain. The frequency of updates can be adjusting in the Settings menu, UI tab.
Combat
Shows action while a player (or a nearby player) is fighting. Any attacks, failed or successful, as well as spells cast will be shown here.
Quickbar
- Main article: Quickbar
The quickbar contains buttons to toggle statuses and actions.
Custom timers
- Main article: Custom timer
Player made timers which can be useful for priests.
Interacting with the world
To interact with objects, tiles, players, creatures, etc, right-click on them. A list of available actions will pop up. Note that some actions are only visible and available with a particular tool active. For example, the "Cut down" action will appear if the hatchet or similar tool is active and a tree tile is right-clicked.
Moving objects
Most objects can be:
- Pushed / pulled
- Pushed / pulled gently
- Rotated (clockwise or counterclockwise)
- Moved to center of tile
- Placed
There are some exceptions, as some items are not able to be moved (eg. guard tower, market stall).
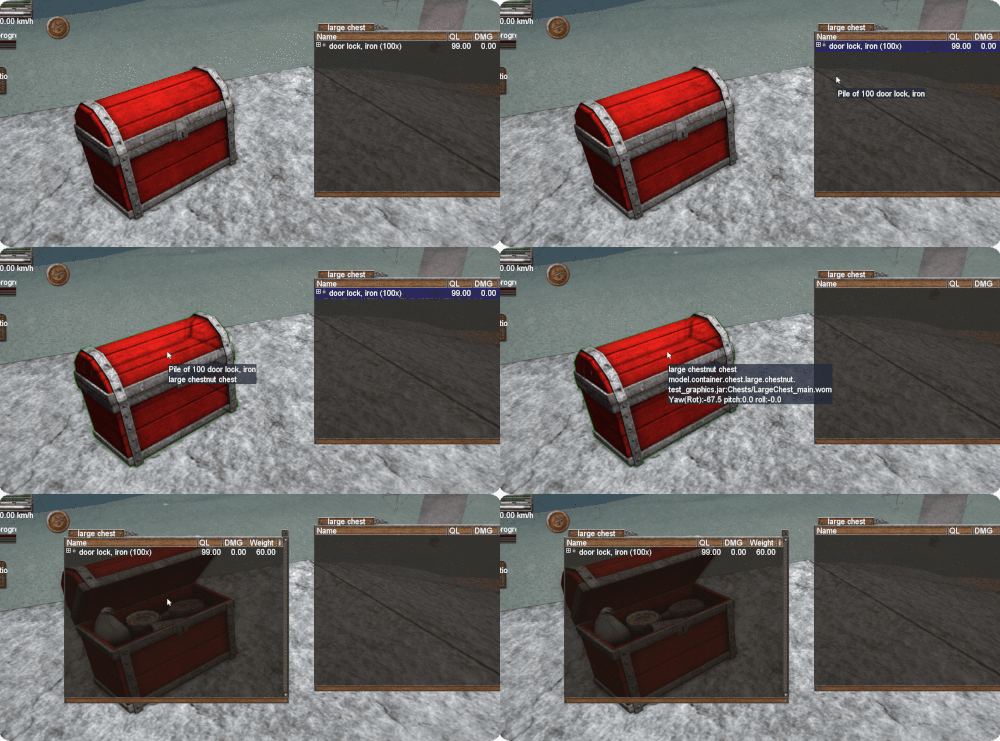
You can also move objects into a container by dragging and dropping the object over the container image:
Place
Placing an item allows you to precisely pick where on a tile to place an item, as well as in what direction.
- To place an item, right click on it and select Drop > Place. To place the item, left-click (or a double click sometimes may be necessary) where you wish it to be placed
- Use the mouse wheel to rotate the object.
- The item will appear where your cursor is as a green silhouette. If the silhouette is red, this means the object may not be placed in that spot. You can place the item within 1 tile of where you stand. (Note: You may move while placing - it will not cancel the action).
- You must have GLSL enabled to place or the green/red silhouette will not show.
- A timer will show in your Event tab, showing 2 minutes remaining. This timer is how long you have until the Place action will time out.
- You may need to pick up or push an item to place it very far away. You cannot place the item that far away.
- If you place an item right under you, the action timer for moving it, is always 5 seconds.
